
We love to scour the internet for ideas, tips and inspiration to help us get to know our pets better, to help make them happier, to learn about their behavior, to discover some
wonderful stories about amazing animals…
amazing animals… In short, we are passionate about finding things that we think you might like, get excited about or help your pets enjoy.
This time, we have found a tutorial that we believe can be of great help to you. So simple that it could be done by anyone. And so beautiful that, if you let your imagination fly, not only your four-legged friend will be delighted, but it will be an original element in the decoration of your home.
The best part? You will be able to make a comfortable bed for your pet with completely recycled materials, so it will cost you very little.
[ video by ExpertoAnimal ]
These are the materials you will need:
- An old sweater
- Needle
- Thread
- A cushion
- Filling (can be cotton, fiber…).
And these are the steps to follow to make the bed for your furry friend:
- The first thing you should do is to place your old sweater on a straight base, which allows you to handle it easily.
- Then it’s time to sew. You can do it by hand or, if you prefer a stronger and cleaner finish, do it using a sewing machine. And the areas to be sewn are: in a straight line the part that goes from one armpit to the other; and the sleeves of the sweater along the part that covers the trunk, from the armpit to, more or less, the elbows.
- The next step is to place the cushion in the square that has resulted in the part of the trunk. and so that it does not come out, sew the lower part of the sweater. Now this original bed is starting to take shape… but there are still a few steps to make it perfect. Here we go!
- The next step is to stuff the arms and neck area of your sweater with your chosen stuffing material.
- When you have it fully stuffed (do not skimp on fiber, remember that the comfort of your best friend depends on it), then sew the neck so that the fiber cannot come out.
- After the above steps, you should have a sweater with a square center and bordered with stuffing. Well, then we only have the last step left before you can show your favorite furry friend his new bed: Join the magnets and sew them together to close the bed completely…
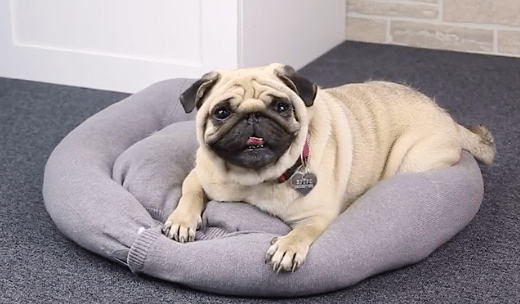
Now you have your pet’s new bed ready. You can start enjoying it now!
But as we know that a picture is worth a thousand words, here we leave you the fantastic video made by the friends of Ideas in 5 minutes, which explains perfectly how to make this bed step by step in a very visual way.
https://www.facebook.com/ideasen5minutos/videos/1833572090191061/
We think it’s a great idea to make a craft that will make our furry friends very happy and that also helps us to recycle and reduce the impact we cause to the environment. With small grains of sand we can build mountains.
It is also an easy and fun project, especially for those in love with handicrafts.
What do you think? Do you dare to put this idea into action and make a bed for your dog or cat?